Build an Isolated Driver as a Java Class
Requirements
Objective
In this module, we will build an isolated sensor driver in Java utilizing the assistance of the Pi4J Library to communicate with our KY-032 Sensor.
Create a Java Project with a Gradle Build System
There are many IDE's, but for this module, we will be using IntelliJ IDEA Community Edition. To follow along, please download using the link provided.
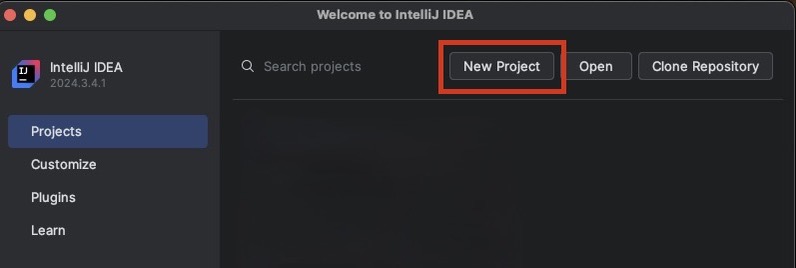
Open up IntelliJ and select New Project:
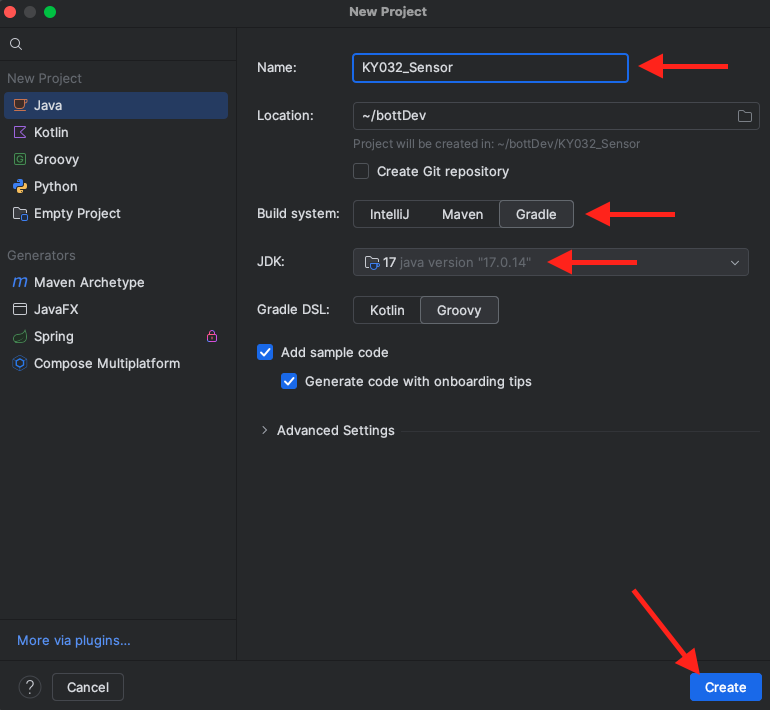
Next, configure a new Java Project to use Gradle as the build system and select Create:
Out of the box, IntelliJ sets up a project strucutre with a build.gradle file for build configuration, a src folder for source code (with main and test subfolders), and integrates the Gradle build system for tasks like building, testing, and packaging.
Updating build.gradle
Adding Library Dependencies
As discussed previously in this module, we will be using the Pi4J Library to communicate with our KY-032 Sensor, which is connected to a Rasbperry Pi. Pi4J was created to provide a friendly object-oriented I/O API and implementation libraries for Java Programmers to access the full I/O capabilities of the Raspberry Pi platform.
Feel free to view more documentation, but for our project, we will require the following (2) packages/plugins:
Luckily, Pi4J release builds are deployed to Maven Central, making it simple to add these libraries to our project. When adding dependencies in a Gradle project, you're declaring external libraries or files (like JARs or other projects) that your project needs to function, which Gradle then manages by fetching, compiling, and packaging them into your build output.
To add a dependency in gradle, the following context can be used:
implementation group:<project> name:<artifact> version:<version>
Navigate to your build.gradle file in the Java Project you created and add the following under the dependencies object:
implementation group: 'com.pi4j', name: 'pi4j-core', version: '2.8.0'
implementation group: 'com.pi4j', name: 'pi4j-plugin-gpiod', version: '2.8.0'
Configure Java-based Application.
As we intend to use this build to create a small, stand-alone application, let's add code to your build.gradle in the appropriate sections:
    plugins {
        id 'application'
    }

    application {
        mainClass = 'org.example.Main'
    }

    tasks.<task name> {
        // Configure the run task
    }
This plugin simplifies building and running Java applications by handling tasks like packaging, creating executable JARs, and generating distribution archives, making it easier to start and package applications. The mainClass property within the application object specifies the fully qualified name of the main class that the application will start with.
The application plugin also adds tasks such as run, startScripts, and installDist to your project. Update the task property with the following code:
tasks.withType(Jar).configureEach {
    duplicatesStrategy = DuplicatesStrategy.EXCLUDE
}
This code snippet ensures that, when creating JAR files, if there are duplicate files, they will be excluded, and only one copy will be included in the JAR file. It’s useful to prevent errors or bloated JARs caused by duplicated resources.
Next, add the following line of code to specifiy which class contains the main method when the build is later initiated by gradle. This defintes which method should be executed when we run JAR with java -jar filename.jar
jar {
    manifest {
        attributes(
                "Main-Class": "org.example.Main"
        )
    }
}
Finally, we will add the following code to our build.gradle to ensure that Java 17 is used, as this is the most stable version that OSH uses.
java {
    toolchain {
        languageVersion = JavaLanguageVersion.of(17) // Change to your desired version
    }
}
At this point, the entirety of your gradle file should look like this:
plugins {
    id 'java'
    id 'application'
}

group = 'org.example'
version = '1.0-SNAPSHOT'

repositories {
    mavenCentral()
}

dependencies {
    testImplementation platform('org.junit:junit-bom:5.10.0')
    testImplementation 'org.junit.jupiter:junit-jupiter'
    implementation group: 'com.pi4j', name: 'pi4j-core', version: '2.8.0'
    implementation group: 'com.pi4j', name: 'pi4j-plugin-gpiod', version: '2.8.0'
}

test {
    useJUnitPlatform()
}

jar {
    manifest {
        attributes(
                "Main-Class": "org.example.Main"
        )
    }
}

tasks.withType(Jar).configureEach {
    duplicatesStrategy = DuplicatesStrategy.EXCLUDE
}

java {
    toolchain {
        languageVersion = JavaLanguageVersion.of(17) // Change to your desired version
    }
}
Create a KY032 Java Class
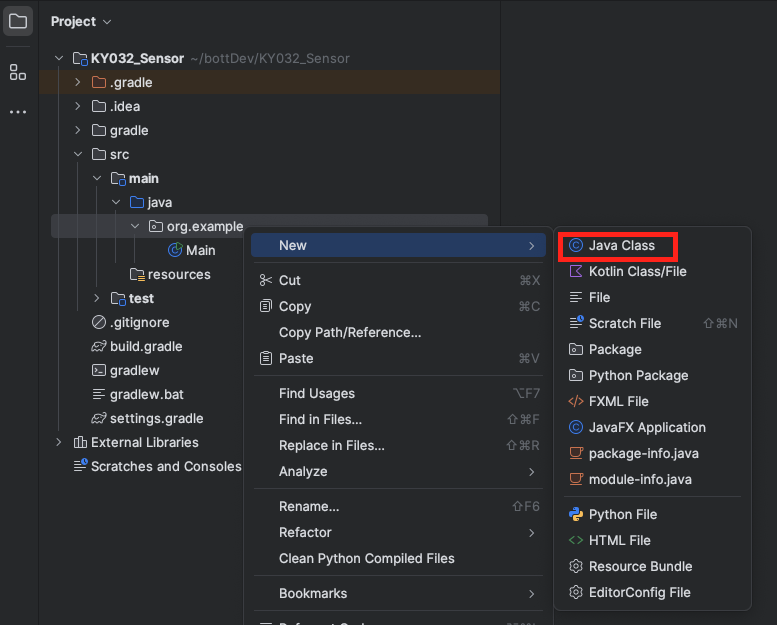
Now that we have configured our build settings, let's create a Java Class to represent our KY-032 Sensor. In your project, navigate to the source code and create a New Java Class and name it KY032_Sensor:
In the following code, we will import our Pi4J dependencies and create a constructor (requiring a single argument) for OUR KY032_Sensor Class. When this class is instantiated, a Pi4J Context is created. This context is an immutable runtime object that holds the configured state and manages the lifecycle of a Pi4J instance. We can edit the configuration of this context to create an input configuration that listens and reports the Raspberry Pi's GPIO signal:
package org.example;

// PI4J DEPENDENCIES
import com.pi4j.Pi4J;
import com.pi4j.context.Context;
import com.pi4j.io.gpio.digital.DigitalInput;
import com.pi4j.io.gpio.digital.DigitalInputConfig;
import com.pi4j.io.gpio.digital.DigitalState;

public class KY032_Sensor {
    // DECLARE CLASS VARIABLES
    private final Context pi4j;
    private final DigitalInput input;
    private final int gpioPin;

    // CONSTRUCTOR
    public KY032_Sensor(int BCMpin) {
        System.out.println("Creating Sensor...");

        // Initialize Pi4J context
        this.pi4j = Pi4J.newAutoContext();

        // Configure GPIO pin (physical pin 16 = BCM pin 23)
        this.gpioPin = BCMpin;
        DigitalInputConfig DINConfig = DigitalInput.newConfigBuilder(pi4j) // DIN = Digital INput
                .id("sensor")
                .name("Obstacle Sensor")
                .address(gpioPin)
                .build();

        this.input = pi4j.create(DINConfig);

        // ADD LISTENER TO READ SENSOR DYNAMICALLY
        this.input.addListener(e -> {
            System.out.println(e.state() == DigitalState.LOW);
        });
    }
}
Congratulations! The hard part is over. Now that you have created a KY032 Sensor class, this can be isolated and called upon anywhere. Let's call it in our Main Class for example.
Navigate to your Main Class in the directory and revise your code to create an instance of the KY032 Sensor. When initialized, the application will listen to sensor and display a boolean to the terminal. True if an obstruction is detected, and false if not.
Even though we connected the output of our sensor the the pin #16 on the Raspberry Pi's GPIO board, this is not the number that gets used. While the physical pin #16, or GPIO pin #4 (Reference Module 02), this is not the number passed used as the argument in our method. Pi4J uses BCM numbering, and not Board numbering. The BCM # for Board Pin #16 is 23.
package org.example;

public class Main {
    public static void main(String[] args) {
        System.out.println("Press Ctrl+C to exit.");
        // CREATE SENSOR INSTANCE
        // Configure GPIO pin (physical pin 16 = BCM pin 23)
        KY032_Sensor sensor = new KY032_Sensor(23);
    }
}